Welcome to the Avaza Conventions Guide, where we embark on a journey towards seamless workflows and hassle-free project management. Just like any challenging expedition, the secret to success is preparation and ensuring your team is on the same page. That’s where the importance of setting up Avaza conventions comes in.
Imagine Avaza as your digital workspace – a place where clarity meets productivity. The potential your team can collectively achieve with Avaza depends on the data you feed into it.
So, here’s a playbook of sorts – a set of guidelines on how to make the most of Avaza. By deciding on these conventions early on, you can lay a robust foundation for your team’s collective success and craft a comfort zone where every click and keystroke feels natural. Onboarding is the perfect time to shape conventions on how to best set up Avaza before any unproductive habits and inefficient workflows creep in.
Encourage your team to think about how to blend Avaza’s capabilities with existing work processes. What rhythms and routines will make teamwork smooth? This is about co-creating your “how-to” guide so everyone can proudly say, “Yes, we’re doing it right.”
Every team is as unique as a fingerprint, and yours is no different. While we paint the big picture, this guide will help sprinkle in some tips and best practices to fuel your discussions. But in the end, your team’s conventions will be tailor-made for your journey ahead.
Let’s turn Avaza into your team’s powerhouse of productivity and collaboration. Here’s to your success and making Avaza your second home!
Project Management Conventions
Project Naming Conventions
– Consistency: Establish a standard format that is consistently used across all projects. This makes it easier to identify and manage projects.
– Clarity: The project name should give an immediate understanding of what the project is about to anyone who reads it.
– Brevity: While being descriptive, keep the name concise to facilitate easy communication and recall.
– Avoid Special Characters: Stick to letters and numbers to ensure compatibility with various software systems and databases.
– Standard Elements: Include standard elements in the name, such as:
Project Type: Indicate whether it’s a development, research, marketing, etc.
Department or Team Name: Useful in larger organizations with multiple teams.
Date or Sequence Information: Such as the year or quarter the project started, or a version number.
Here are a few examples of project names that adhere to the conventions mentioned above:
DevTeam_Q1_2024_AutomationUpgrade
Explanation: This name is for a development team’s project starting in the first quarter of 2024, focusing on upgrading automation systems. Breakdown: DevTeam: Indicates the department or team (Development Team). Q1_2024: Indicates the time frame (First Quarter of 2024). AutomationUpgrade: Describes the project goal.
Mktg2024_SocialMediaExpansion
Explanation: A marketing project for the year 2024, aimed at expanding social media outreach. Breakdown: Mktg2024: Combines the department (Marketing) with the year. SocialMediaExpansion: Clearly states the project’s focus.
HR_DiversityInclusion_InitiativeV3
Explanation: The third version of a Human Resources project focused on diversity and inclusion initiatives. Breakdown: HR: Denotes the Human Resources department. DiversityInclusion: The project’s focus. InitiativeV3: Indicates this is the third version or iteration of the initiative.
RnD_EcoFriendlyPackaging_2024
Explanation: A 2024 research and development project on eco-friendly packaging solutions. Breakdown: RnD: Indicates the Research and Development team. EcoFriendlyPackaging: Describes the project’s research area. 2024: The year of the project.
Sales_CRM_Upgrade2024Q2
Explanation: A project in the second quarter of 2024 by the sales team to upgrade the Customer Relationship Management (CRM) system. Breakdown: Sales: The department in charge. CRM_Upgrade: The objective of the project. 2024Q2: Timeframe of the project.
Project Codes
– Unique Identifiers: Develop a system for assigning project codes that can uniquely identify a project. This could be a combination of letters and numbers that reference the project’s nature and its initiation date, like “WEBREV-0923” for a website revamp project starting in September 2023.
– Searchability: Ensure that the project code is easily searchable within Avaza, making it simpler to locate project-related information.
Project Categorization
– Grouping: Set up the color-coded Project Categoriesto use them to group projects by type of work, department, project stage, region, or any other relevant criterion.
– Filtering: This helps in filtering projects in different views and reports easily.
– Here are some examples of project categories.
Type of Work: Development Project, Research Project, Marketing Campaign, Operational Improvement, Product Launch.
Department: Human Resources, Finance, Information Technology, Sales, Customer Service.
Project Stage: Conceptualization, Planning, Execution, Monitoring and Controlling, Closure.
Region or Location: North America, Europe, Asia-Pacific, Middle East, South America.
Client or Customer Segment: Enterprise Clients, Small and Medium Businesses, Government, Non-Profit, Consumer.
Technology or Platform: Cloud Computing, Mobile Development, Artificial Intelligence, Blockchain, Internet of Things (IoT).
– Project Tags: For additional context, you can set up Project Tags. You can assign multiple tags to projects by entering them directly in the provided field under Project Settings.
Project Templates
– Standardization: Create templates for different types of projects your team frequently handles. These templates should include pre-defined task lists and project settings that can be easily adapted for new projects.
– Efficiency: Utilizing templates saves time and ensures that nothing is overlooked during the project setup phase.
– Best Practices: Embed lessons learned from past projects into new templates to continuously improve the project initiation process.
Project Documentation
– Initial Setup: From the start, create a dedicated section/tasks within each project for documentation. This could include project charters, business cases, and any initial requirements or specifications.
– Project Notes: Use the Project Notes field (within the Project Settings page) to define goals and/or objectives to remind teammates what each project is for.
Project Ownership
– Use the Project Owner field to define the Project Lead/Manager
– This identifies who is overall responsible for the success of the project
– Use this field to filter data in reports for a specific project owner for performance review and other reporting purposes.
Access and Permissions
– Control: Define who has access to the project at the creation stage. Determine the levels of permissions for different roles within the project.
– Privacy: Ensure sensitive projects have restricted access to safeguard confidential information.
Conventions Specific to Time Tracking on Projects
When creating new projects in Avaza, it’s crucial to implement specific conventions for time tracking to ensure accuracy and consistency. Here are the guidelines to follow:
– Task-Linked Time Entries: Enforce the rule that all timesheet entries must be tied to a designated task. This protocol ensures each minute logged is accountable to a particular aspect of the project, enhancing traceability and project time management.
– Completion-Based Time Tracking Restrictions: Prohibit the logging of time against tasks that are marked as completed. This convention prevents the accrual of time on inactive tasks, ensuring that all time tracking aligns with current project activities.
– Mandatory Timesheet Narratives: Require detailed notes for every timesheet submission. This practice is vital for contextualizing the work performed, facilitating project oversight, and supporting accurate client billing.
– Tailored Timesheet Categories: Define and manage timesheet categories specific to the project’s scope, such as Design, Development, Testing, or Deployment. Each category should be appropriately marked to reflect whether the time is billable and payable. Integrate only the necessary categories to maintain focus and eliminate any ambiguity in time tracking.
– Predefined Billing Strategy for Time: Determine the billability of project time in advance. Set clear billing conventions, whether on a fixed-fee, time-and-materials basis, or as non-billable hours. Configure the project’s billing parameters within Avaza to reflect these decisions, ensuring a streamlined process for subsequent invoicing and financial assessments.
Conventions for Project Budget Management in Avaza
When setting up a new project in Avaza, adhering to specific conventions for managing the project budget is critical to ensure financial control and project success. Here’s how to structure your budget management approach
– Budget Type Selection: Choose a budget type that best fits the nature of the project and enhances your ability to track financial progress. Whether it’s a fixed price, time and materials, or a not-to-exceed time budget, select the model that facilitates effective budget tracking.
– Detailed Expense Budget Configuration: If your project entails tracking expenses for various expense categories, set specific budgets for each. This level of detail helps in monitoring and controlling costs in a granular fashion, allowing for immediate adjustments as needed.
– Proactive Budget Alerts Setup: Implement automated budget alerts within Avaza to notify you as you approach or exceed predetermined budget thresholds. This early-warning system is crucial for maintaining budget health and enables proactive measures to prevent budget overruns.
Initial Project Setup Checklist
– Checklist Creation: Develop a checklist to ensure all steps in the project setup are completed. This may include budget approval, resource allocation, risk assessment, and more.
– Quality Assurance: This checklist not only serves as a guide for the project manager but also as a quality assurance tool to ensure all projects meet organizational standards before kickoff.
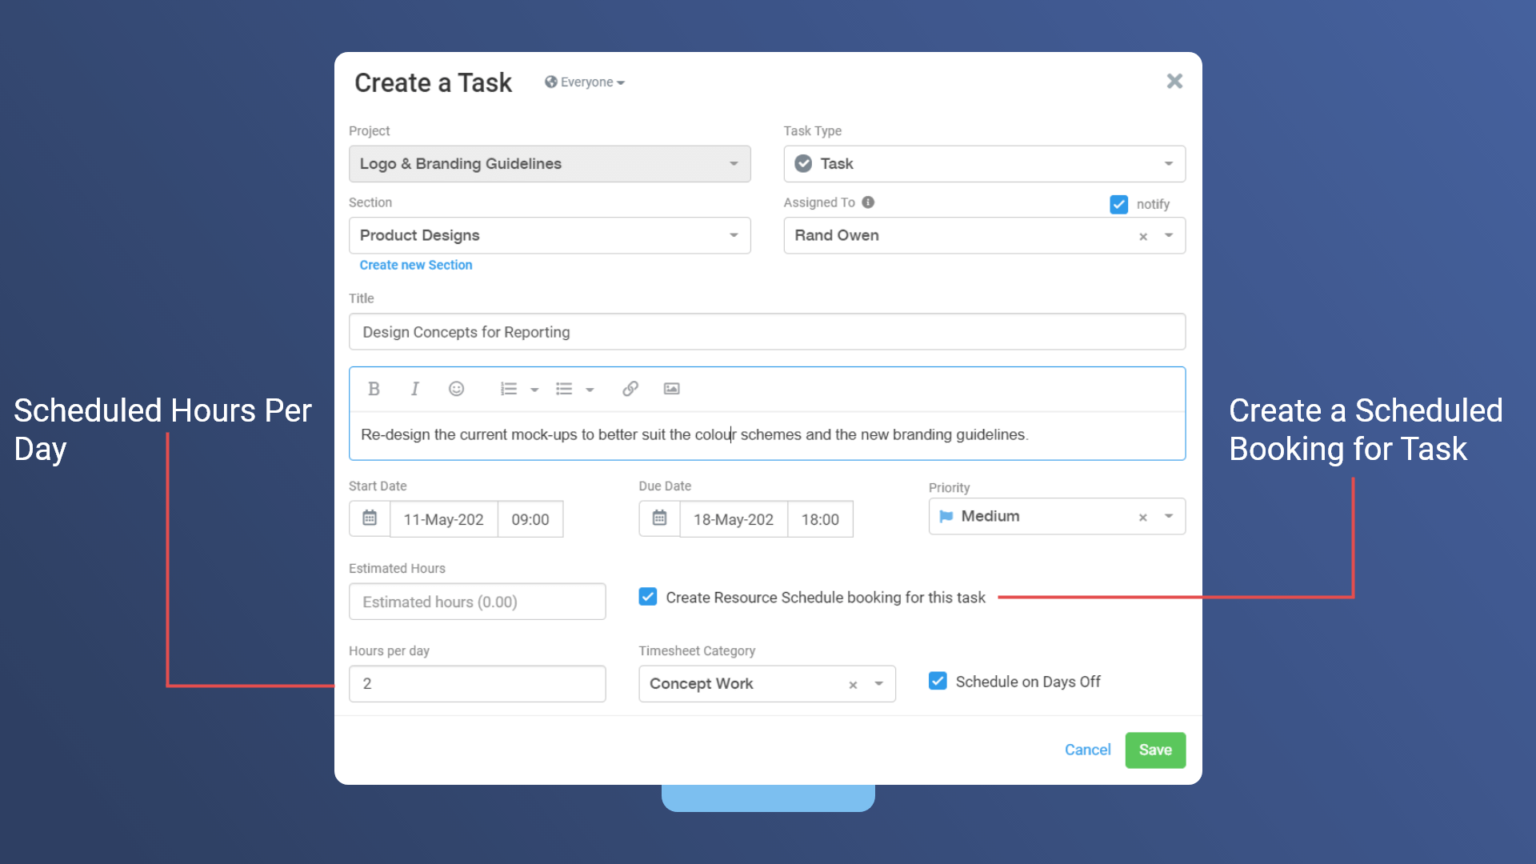
Task Management Conventions
Establishing best practice conventions for creating tasks in a project management tool like Avaza is essential for maintaining clarity, ensuring accountability, and tracking progress effectively. Here’s a curated list of conventions to consider:
Naming Conventions
Creating effective task title naming conventions is essential for clarity, efficiency, and easy tracking in project management. A well-structured task title provides immediate insight into what the task involves. Here are some key components to consider when establishing a task naming convention. – Clear Action Verb: Start with a verb that clearly describes the action required, such as “Design”, “Implement”, “Review”, “Test”, “Develop”, etc.
– Specific Subject: Include a specific subject that the action is being applied to. This could be a feature, a document, a part of the project, etc.
– Brief and Descriptive: Keep the title concise yet descriptive enough to understand the task at a glance.
– Consistent Naming Structure: Apply a uniform naming structure for tasks to facilitate easy searching and categorization.
Here are examples of task titles following these conventions:
Develop LoginPage UI Design
Develop: Action Verb. LoginPage: Specific Subject. UI Design: Additional detail about the subject.
Review Documentation APIv2
Review: Action Verb. Documentation APIv2: Specific Subject.
Test Payment Gateway Integration
Test: Action Verb. PaymentGateway Integration: Specific Subject.
Write Blog Post CloudTech Trends 2024
Write: Action Verb. BlogPost CloudTech Trends 2024: Specific Subject.
Task Types
Avaza’s Task Types feature offers enhanced flexibility and specificity in task management.
– Purpose: Differentiate between various tasks like Issues, Bugs, Change Requests, Campaigns, Leads, Ideas, etc.
– Implementation: Create unique Task Types for different work categories. This helps in better organization and understanding of the nature of each task.
– Visualization: Assign unique icons to each Task Type for easy visual differentiation in the app.
– Workflow Customization: Each Task Type can have its own set of Custom Task Statuses, allowing for tailored workflows for different types of tasks.
Here are a few examples of task types and their corresponding statuses.
– Phase Identification: Define distinct phases/sections of the project (e.g., Planning, Execution, Review, Closure) and categorize tasks under these phases to reflect the project lifecycle.
– Sequential Execution: Order tasks within each phase in a logical sequence that reflects the actual workflow.
– Phase Milestones: Establish clear milestones at the end of each phase, which act as checkpoints for project health and progression. Create a task type called Milestone with the required statuses to enforce this feature.
Prioritization and Categorization
– Priority Levels: Assign priority levels to tasks to indicate urgency and importance, guiding team members on focus areas.
– Categorization Tags: Utilize tags to categorize tasks by type, phase, department, or any other relevant grouping.
Subtasks
– Breakdown into Subtasks: For complex tasks, break them down into smaller, manageable subtasks to make the work less daunting and more structured.
– Use as Checklists: Incorporate subtasks as checklists within tasks to outline all necessary components and steps needed for completion.
Assignment and Responsibility
– Clear Assignee(s): Assign each task to specific team members to establish clear responsibility.
– Collaborator Inclusion: Add collaborators (task followers) who need to be kept in the loop, even if they aren’t directly responsible for the task execution.
Time Management
– Estimated Duration: Provide an estimated duration or effort required to complete each task to aid in resource planning.
– Due Dates: Set realistic due dates for tasks to ensure team members can manage their time effectively.
Detailed Descriptions
– Comprehensive Instructions: Include detailed instructions or steps required to complete the task.
– Attachment of Relevant Documents: Attach necessary files or links to relevant documents directly in the task to provide all needed resources.
Progress Tracking
– Status Updates: Use status labels to track the progress of a task through its lifecycle (e.g., “To Do,” “In Progress,” “Review,” “Done”).
– Percentage Complete: Use the percentage complete field for each task to indicate its degree of completion, offering a clear quantifiable measure of progress.
– Regular Check-ins: Encourage team members to update task progress regularly.
Feedback and Communication
– Commenting Best Practices: Foster a culture of prompt and clear communication within task comments for any queries or updates. For example, If you change the start or due date, add a comment to explain why it was moved to reset expectations.
– Review Points: Set specific review points or milestones for feedback and quality checks.
Access and Permissions
– Ensure only project members that should be allowed to create, update, delete, or comment on tasks are configured with the appropriate task-level permissions
Using Recurring Tasks in Avaza
– Identify Suitable Tasks for Recurrence: Analyze your workflow to identify tasks that occur regularly, such as monthly reports, weekly team meetings, or routine maintenance activities. These are ideal candidates for the recurring task feature.
– Set Appropriate Frequency and Timing: Configure the recurrence of tasks to align with their required frequency (daily, weekly, monthly, etc.). Ensure that the timing of task creation allows adequate lead time for completion before the deadline.
– Assign Tasks Proactively: Assign recurring tasks to the appropriate team members well in advance. This ensures that everyone is aware of their responsibilities and can plan their workload accordingly.
– Monitor and Adjust Schedules as Needed: Keep an eye on the overall schedule of recurring tasks. If certain tasks consistently end up being rushed or delayed, adjust their recurrence settings or assign deadlines accordingly.
Time Tracking Conventions
Establishing best practice conventions for time tracking is crucial for maintaining accurate records and gaining insightful data on the effort invested in various tasks and projects. Provide training and resources to emphasize the importance of time tracking for project management, client billing, and productivity analysis.
Emphasise Why Track Time
– Enhanced Productivity: Time tracking helps in identifying how much time is spent on various tasks, leading to a better understanding of productivity levels. It allows individuals and teams to focus on prioritizing tasks effectively.
– Accurate Billing and Transparency: For service-based businesses, time tracking is essential for accurate client billing. It provides transparency and builds trust by clearly showing how much time was spent on different project aspects.
– Project Management and Planning: Time tracking offers critical data for project planning and management. It helps in estimating time for similar tasks in future projects and in balancing workloads.
– Cost Management: By understanding where time is spent, organizations can better manage costs associated with labor and resources.
– Performance Analysis: Time tracking aids in performance evaluation, both at an individual and team level. It helps in identifying areas of efficiency and those needing improvement.
– Client and Stakeholder Reporting: Regular time tracking allows for more detailed and accurate reports to clients and stakeholders, ensuring informed decision-making.
– Compliance and Legal Requirements: In some industries, time tracking is necessary to comply with legal and contractual obligations, especially in terms of billable hours.
Timer vs Manual Timesheet Entry
Using a Timer:
– When to Use: Ideal for scenarios requiring high precision, such as improving productivity or tracking detailed work patterns.
– Advantages: Accurately measures time to the minute, capturing each work session’s start and end times.
– Suitability: Best for tasks where minute-by-minute tracking is crucial.
Manual Timesheet Entry:
– When to Use: Suitable for compliance purposes, general project time estimates, or payroll tracking.
– Flexibility: Allows for approximation of time spent on tasks, usually at the end of the day or week.
– Common Use: Most organizations use this method for its simplicity, especially when needing to know the duration of activities or ensuring daily work hour quotas are met.
Deciding the Method:
– Determine the Need for Precision: If minute-by-minute tracking is not critical, manual entry is sufficient.
– Consider the Purpose of Tracking: For productivity improvement, a timer is preferable. For general project management or compliance, manual entry works well.
– Balance Overhead vs. Value: Weigh the administrative effort of detailed time tracking against the insights and value it provides to the organization.
Conclusion:
The choice between using a timer and manual timesheet entry in Avaza depends on the specific needs for precision and the purpose of time tracking. While timers offer detailed insights, manual entries are more practical for broader time estimates and compliance requirements.
Frequency of Time Tracking
– Daily Time Entry: Encourage employees to fill in their timesheets daily, ideally at the end of the workday, to ensure accuracy and ease.
– Format Flexibility: Allow time logging in either decimal (e.g., 1.5 hours) or clock format (e.g., 1:30).
– Avoid Weekly Logging: Filling timesheets weekly can be counterproductive, leading to forgotten or inaccurate entries due to the effort required to recall an entire week’s activities.
– Efficiency of Daily Logging: Daily entry is quicker and more efficient, often taking just a few minutes, and can be done with fresh memory, reducing the chance of errors.
– Copy Previous Timesheets: A proactive approach is to copy the previous days’ timesheets at the start of the day and use this list to record time at the day’s end, ensuring all tasks are accounted for.
This daily approach to time tracking strikes a balance between continuous monitoring and the burdensome task of recalling a week’s worth of work, making it an effective practice for time management in Avaza.
Timesheet Categories
In Avaza, Timesheet Categories are a vital tool for accurately tracking and managing time spent on various types of work within projects. Implementing best practice conventions for these categories can greatly enhance project management, billing accuracy, and reporting.
– Clarity in Categories: Establish well-defined timesheet categories that accurately reflect the type of work performed. These categories should be succinct and self-explanatory to ensure everyone on the team understands them without confusion.
– Billability and Payability: Clearly designate each timesheet category as billable, non-billable, payable, or non-payable. This delineation will streamline the process of invoicing clients and compensating employees or contractors.
– Unambiguous Naming: Adopt a clear and consistent naming convention for timesheet categories to avoid any ambiguity. Each name should be intuitive, enabling team members to select the appropriate category without hesitation.
– Consistency Across Projects: Where applicable, use a consistent set of categories across projects to streamline reporting and comparison.
– Use of Default Categories: For common activities across most projects, set them as default categories to automatically include them in new projects.
– Archiving Unused Categories: Archive categories that are no longer in use to keep the timesheet system clean and up-to-date.
Examples of Timesheet Categories
For IT Services Company
Development: Coding, programming tasks.
Testing/QA: Quality assurance and testing activities.
Project Management: Planning, tracking, and managing IT projects.
Technical Support: Customer support and troubleshooting.
Research: Investigating new technologies or solutions.
For Marketing Agency
Creative Design: Graphic design, branding, and creative work.
Content Creation: Writing blogs, articles, and creating content.
Client Consultation: Time spent consulting clients.
Document Drafting: Drafting legal documents and contracts.
Court Appearance: Time spent in court.
Legal Review: Reviewing and advising on legal documents.
Optional Settings
– Task-Specific Tracking: Enforce the selection of a specific task when tracking time, linking every time entry to a particular piece of work for detailed project management and client billing.
– Time Entry Notes: Require users to add notes to their time entries, providing context and justifications for the time spent, which is especially useful for client billing and internal reviews.
– Start/End Time: Enable and enforce the use of start and end times on timesheets to capture the exact working window for more granular insights and compliance.
Regular Time Audits
– Frequency: Conduct a time audit at least once a week, or monthly at a minimum. Weekly audits are preferable as they prevent data accumulation, making the process less cumbersome.
– Focus on Correct Categorization: Verify that each entry is attributed to the correct project, timesheet category, and task for accurate reporting and billing.
– Manage Entry Anomalies: Look for and adjust entries that are too short (under 1 minute) or too long (over 8 hours) to avoid inaccuracies.
– Initial Focus: Initially, encourage team members to simply start tracking time, even if it means categorizing it later.
– Gradual Detail Introduction: As time tracking becomes habitual, gradually introduce more detailed tracking requirements and reduce the dependency on time audits.
– Use of Required Fields: Implement required fields in time entries for better organization and accuracy, once the team is comfortable with time tracking.
Encourage Daily Tracking of Time
Timesheet Approval Workflow
– Project-Specific Approval Settings: Tailor the timesheet approval process for each individual project to match its unique requirements. This customization enables a workflow that aligns with the project’s governance structure and client needs.
– Approval Requirements Identification: Clearly define which team members’ timesheets require approval. This might be based on their role, the type of work, or project-specific criteria.
– Approval Authority Designation: Identify and document who is responsible for approving timesheets for each project. This could include internal managers, project leads, or even external customer contacts when relevant and agreed upon. The approvers must be informed of their role and responsibilities within the approval workflow to ensure accountability.
– Submission Timeline: Establish a routine schedule for when timesheets need to be submitted. This could be at the end of each day, weekly, or at specific milestones throughout the project. Consistency in submission aids in timely approvals and efficient project management.
– Review and Decision Timeframe: Specify the time frame within which timesheets should be reviewed, approved, or rejected after submission. This timeframe should balance the need for a thorough review with the necessity of prompt payment and billing processes. Setting clear expectations for review times prevents bottlenecks and ensures operational fluidity.
Use the Avaza Mobile Timesheet App
Using the Avaza mobile app offers several significant benefits for teams, enhancing overall productivity and efficiency in project management and time tracking. Here are the key reasons why teams should use the mobile app:
– Convenience and Accessibility: The mobile app allows team members to track time and manage tasks from anywhere, at any time. This is especially beneficial for remote or on-the-go employees who aren’t always at their desks.
– Real-Time Tracking: With the app, users can start and stop the timer as they switch between tasks, leading to more accurate and timely recording of hours worked. This real-time tracking reduces the likelihood of forgotten or inaccurately logged hours.
Increased Productivity: The app’s user-friendly interface and quick access to key features help streamline common tasks, reducing administrative overhead and allowing more time to be focused on core work activities.
Enhanced Flexibility: The flexibility to track time, and view progress on a mobile device is particularly useful for teams with flexible working arrangements or those working across different time zones.
Easy Timesheet Submission and Approval: The ability to submit timesheets for approval directly from the app simplifies the approval process, ensuring timely processing of billable hours and payroll.
Seamless Synchronization: The app synchronizes data with the web platform, ensuring that all information is up-to-date and consistent across devices.
Reduced Risk of Errors: Manual time entry at the end of the day or week often leads to errors due to forgotten details. The app’s real-time tracking helps mitigate this risk.
On-Demand Insights and Reporting: Access to real-time data and analytics on the go helps the team make informed decisions quickly, based on the latest insights.
Expense Management Conventions
Expense Categories
– Consistency Across Projects: Maintain consistent expense categories across different projects for uniformity and easier analysis. This aids in comparing expenses across projects and over time.
– Specific and Relevant Categories: Create categories that are specific to your business needs and relevant to the types of expenses incurred. Avoid overly broad categories that might lead to confusion.
– Regular Review and Update: Periodically review the categories to ensure they remain relevant and update them to reflect changes in business operations or project types.
– Clear Naming Conventions: Use clear and descriptive names for each category to ensure that employees can easily understand where to allocate expenses.
– Training and Guidelines: Provide training and guidelines to employees on how to categorize expenses correctly. This ensures consistency in expense tracking.
Configuring Per Unit Price Expenses:
– Mileage Tracking: Set up specific expense categories for mileage where expenses are calculated on a per-unit basis (e.g., per mile or kilometer).
– Unit Price Definition: Clearly define the rate per unit for such categories to ensure consistency and accuracy in expense claims.
– Documentation and Verification: Encourage employees to maintain accurate logs or records for unit-based expenses, such as travel distances for mileage claims, to support their expense reports.
Implementing Markup on Billable Expenses:
– Markup Configuration: For expenses that are billable to clients, configure categories to include a markup. This can be a fixed amount, a percentage of the cost, or a combination of both.
– Transparency with Clients: Ensure that the markup policy is communicated to clients, either in the contract or through initial discussions, to maintain transparency and avoid disputes.
– Automatic Calculation: Configure expense categories in Avaza to automatically calculate and apply the markup when these expenses are added to invoices.
– Differentiating Markup Rates: Consider setting different markup rates for different types of expenses, depending on the nature of the work.
– Review and Adjust Markup Rates: Regularly review the markup rates to ensure they remain appropriate and competitive. Adjust them as necessary based on market conditions, cost changes, or client feedback.
Common Expense Categories for Professional Services Businesses
– Travel: Airfare, accommodation, ground transportation, mileage, parking fees. – Meals and Entertainment: Client meetings, team lunches, business dinners. – Office Supplies: Stationery, printing, office equipment. – Software and Subscriptions: Software licenses, online service subscriptions. – Professional Development: Training courses, workshops, certifications. – Communications: Phone bills, internet expenses, postage. – Marketing and Advertising: Digital marketing, print ads, promotional materials. – Legal and Professional Fees: Legal consultations, accounting services. – Utilities: Electricity, water, heating for office premises. – Insurance: Business insurance, liability insurance. – Maintenance and Repairs: Office maintenance, equipment repairs. – Equipment Purchase or Rental: Computers, office furniture, specialized tools.
Using Appropriate Tax Codes
– Understand Tax Regulations: Gain a thorough understanding of relevant tax laws and regulations. This is crucial for applying the correct tax codes to different types of expenses.
– Maintain an Updated Tax Code List: Keep your list of tax codes in Avaza up-to-date. Regularly review and update the tax codes to reflect any changes in tax legislation.
– Train Team Members: Ensure that all team members who create expense entries are trained on how to use tax codes correctly. This includes understanding which tax codes apply to different types of expenses.
– Clear Tax Code Definitions: Provide clear definitions and guidelines for each tax code in your system. This helps team members in selecting the appropriate tax code for each expense entry.
– Consistency in Tax Code Application: Apply tax codes consistently across all expense entries. Inconsistent application of tax codes can lead to errors in financial reporting and tax filings.
– Consult with Tax Professionals: If uncertain about which tax code to apply, consult with a tax professional. This is especially important for complex tax situations or when dealing with international expenses.
Receipt Submission Policy
– Implement a mandatory receipt submission policy for all expenses.
– Utilize mobile apps for on-the-go receipt capture and upload, ensuring timely and efficient expense reporting.
Thresholds and Limits
– Set clear spending limits for different categories or employee roles to control costs.
– Inform all employees of these limits and require pre-approval for any expenses that exceed them.
Real-time Expense Tracking
– Encourage real-time expense reporting to avoid end-of-month reporting backlogs and to keep financial tracking up-to-date.
Currency Handling
– For teams working across borders, define how foreign currency expenses should be recorded and reimbursed.
– Use the software’s built-in currency conversion tools to maintain accuracy in reporting.
Mandating Notes
– Mandate notes for every expense entry, requesting a detailed description and the business justification for the expense.
– Regularly audit expense notes to ensure they meet the required standard of detail.
Billable Expense
When managing expenses in Avaza, discerning between billable and non-billable expenses is crucial for accurate client billing and internal accounting. To determine if an expense is billable, consider the following parameters:
– Client Contract Agreements: Review the client’s contract to identify what types of expenses are billable. Only mark an expense as billable if it aligns with the agreed terms.
– Direct vs. Indirect Costs: Direct costs related specifically to a client project can often be billed. Indirect costs like administrative expenses are typically non-billable.
– Expense Entry: Train team members to assess each expense against the billable expense parameters. Encourage them to make a judicious decision at the time of expense entry.
Specifying Supplier Details
– Enforce a convention where the supplier or merchant details are mandatory for each expense entry in Avaza.
– This allows better insight into spending patterns with each supplier and assists with future negotiations.
Expense Approval
– Implement a strict timeline within Avaza for expense submission and approvals, ensuring timely processing and reimbursement.
– Once an expense is approved in Avaza, ensure it is locked to prevent post-approval edits.
– Establish a clear procedure for submitting adjustments to locked expenses, should the need arise.
– Assign appropriate permissions in Avaza to control who can approve expenses, ensuring accountability.
Reimbursing Staff Members
– Streamline Reimbursement with Digital Processes: Transition from paper-based systems to Avaza’s Expense Module for efficient reimbursement processes. Encourage your team to submit their reimbursable expenses digitally for faster processing and payment.
– Clear Marking of Reimbursable Expenses: Ensure that team members clearly mark expenses that are for reimbursement. This clear identification helps in quick sorting and processing during the expense approval workflow.
– Educate Team on Reimbursement Policies: Regularly inform and train your team on the company’s expense reimbursement policy. Clear understanding of the policy helps staff submit compliant and approvable expenses.
– Efficient Review and Approval Process: Set up an effective review process for reimbursable expenses. Expenses should be easily identifiable and verifiable against the company’s reimbursement policies during the approval workflow.
– Implement a Rejection Protocol: Have a clear protocol for rejecting expenses that do not comply with your reimbursement policy. Ensure that the reasons for rejection are communicated clearly to the staff for understanding and future compliance.
– Timely Reimbursements: Establish a commitment to prompt reimbursement upon approval of expenses. Timely payments enhance staff morale and trust in the company’s processes.
Create Recurring Expenses for routine Expenses
– Automate Routine Expenses: Utilize Avaza’s recurring expense feature for regular bills such as rent, internet, and phone services. Automating these expenses saves time and ensures they are consistently recorded without manual intervention.
– Set Up Flexible Scheduling: Tailor the frequency of recurring expenses to match the billing cycle – be it weekly, fortnightly, monthly, or quarterly. This alignment ensures that expenses are recorded accurately in relation to their occurrence.
– Manage Recurring Profiles Actively: Regularly review and adjust your recurring expense profiles. Be proactive in pausing, resuming, or removing profiles as needed, especially in response to changes in your regular expenses or service agreements.
– Ensure Accurate Expense Categorization: Categorize recurring expenses correctly to maintain accurate financial records. This practice aids in precise budgeting and financial reporting.
– Keep Documentation Up-to-Date: Maintain up-to-date documentation and receipts for all recurring expenses, even though they are automated. This is important for auditing and financial compliance.
Quoting Conventions
Creating effective quotes is a critical step in winning business and establishing clear expectations with your clients. Here are some best practice conventions for creating quotes in Avaza:
Standardized Quote Templates
– Develop a set of standardized quote templates that reflect your brand and include all necessary legal and project-specific terms.
– Ensure consistency in the look and layout to maintain professionalism across all client interactions.
Detailed Service Descriptions
– Clearly define the scope of work, deliverables, timelines, and any dependencies or prerequisites.
– Use language that is easy to understand, avoiding jargon that might confuse the client.
– Ensure the subject line clearly states the purpose of the quote. Include specific identifiers such as the project name, or service type.
– If offering a discount, show the original price and the discounted rate to demonstrate value.
Accurate Tax Code Application
– Always ensure the correct tax code is applied to each line item. This is crucial for maintaining compliance with local tax laws and regulations.
– Periodically review and update the tax codes in Avaza to reflect any changes in tax legislation. This practice helps in avoiding any discrepancies and potential legal issues in financial documentation.
Validity Period
– State the validity period of the quote to encourage timely decision-making.
– Make sure that the period is realistic, giving the client enough time to consider the proposal.
Terms and Conditions
– Include or attach standard terms and conditions, such as payment terms, cancellation policy, and any guarantees or warranties.
– Ensure that these are vetted legally and easy to understand.
Follow-Up Protocol
– Establish a follow-up timeline for when to check in with the client after sending a quote.
– Use Avaza’s tracking features to monitor which quotes have been sent, viewed, and remain unanswered.
Approval Process
– Implement an internal review and approval process before any quote is sent to a client.
– Ensure quotes are reviewed by a project manager or senior team member for accuracy.
– Encourage and track client feedback on the quotes provided to continuously improve the quoting process.
– Request the customer to Approve the Quote online for audit trail and transparency.
– Ensure that all details from the quote are transferred accurately to the project plan.
Analytics and Reporting
– Use Avaza’s reporting features to analyze which quotes are successfully converted into invoices.
– Identify trends and make data-driven decisions to improve quoting practices.
Simplified Client Access
– Invite clients to Avaza’s Client Portal where they can review and respond to quotes, as well as access their estimate and invoice history, making it easier to manage their accounts and payments.
– Ensure clients can download PDF copies of estimates and invoices, simplifying their record-keeping and tax preparation processes.
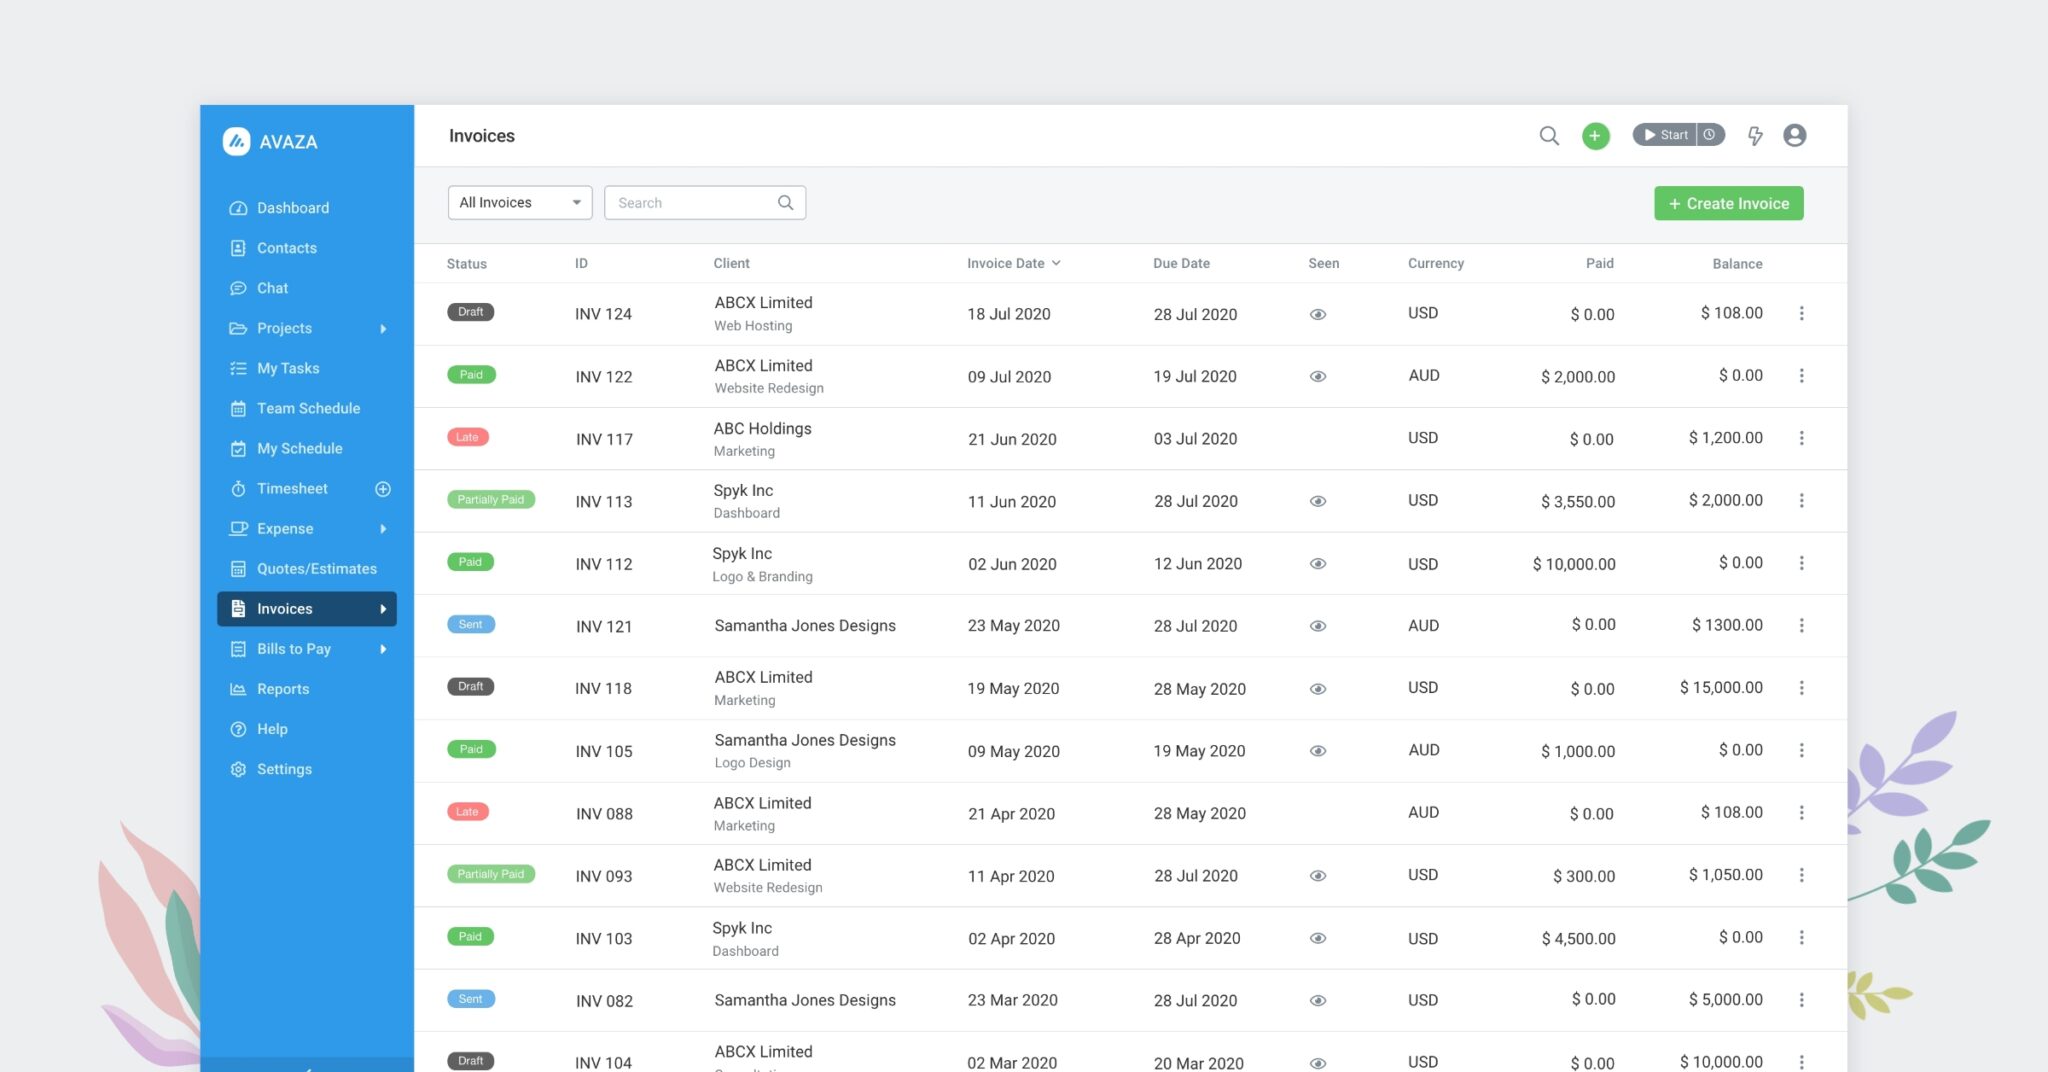
Invoicing Conventions
Creating an effective and efficient invoicing process is crucial for maintaining cash flow and customer satisfaction. Here are best practice conventions for managing the invoicing module in Avaza or similar project management and accounting software:
Invoice Template Consistency
– Create Branded Invoices: Use invoice templates to reflect your brand identity in your invoices by incorporating your business logo and choosing colors that align with your brand. This personalization adds a professional touch and makes your invoices instantly recognizable to your clients.
– Flexible Field Customization: Utilize the feature to add or remove fields on the invoice. Tailor your invoice template to include necessary details like currency, pricing, discounts, and taxes.
– Adapt Templates for International Clients: If your business caters to an international clientele, develop different templates for each language and region. Customize these templates with translated labels/buttons, and region-specific business names and addresses to cater to local practices and languages.
– Regular Template Updates: Keep your invoice templates updated to reflect any changes in your branding, business details, or legal requirements. Regular updates help maintain accuracy and relevance in your invoicing.
– User-Friendly Layout: Design your invoice templates with a clear and easy-to-read layout. Organize the information logically to make it easy for clients to find key details like the total amount due, payment terms, and due date.
Clear Identification
– Use Unique Invoice Numbers: Assign a unique invoice number to each invoice. This is crucial for tracking and reference purposes, making it easier to manage invoices and avoid confusion in financial records. This is often done automatically by Avaza, but it’s good to check the sequence and format.
– Craft Clear and Concise Subject Line: Ensure that the subject line of each invoice is clear and concise, accurately reflecting the purpose of the invoice. This aids clients in quickly understanding what the invoice is for, which is especially helpful when they are managing multiple invoices.
– Incorporate Customer PO Numbers: If a customer has provided a Purchase Order (PO) number, always include this in the designated PO number field on the invoice. This aligns your billing with the customer’s internal purchase authorization, facilitating quicker approval and payment processes.
Itemized Breakdown
– Provide a detailed breakdown of services or products with clear descriptions, quantities, and prices to avoid disputes and clarify exactly what the client is being billed for.
– Indicate any discounts, taxes, or additional charges to maintain transparency with your clients.
Accurate Tax Code Application
– Always ensure the correct tax code is applied to each line item. This is crucial for maintaining compliance with local tax laws and regulations.
– Periodically review and update the tax codes in Avaza to reflect any changes in tax legislation. This practice helps in avoiding any discrepancies and potential legal issues in financial documentation.
Payment Terms
– Set and communicate clear payment terms (e.g., due upon receipt, 30-day terms) and include them on every invoice.
– Highlight the due date prominently on the invoice to encourage timely payment.
Configure Online Payment Options
– Integrate Popular Payment Gateways: Link Avaza with widely-used payment platforms like PayPal, Stripe, and Payoneer to provide diverse and convenient payment options for your clients.
– Enable ‘Pay Now’ Feature on Invoices: Ensure your Avaza invoices include the ‘Pay Now’ button, allowing clients to make quick online payments directly from their invoice.
– Offer Multiple Payment Methods: Provide a variety of payment methods, including credit/debit cards, digital wallets, and bank direct debits, to cater to different customer preferences.
– Leverage Direct Debit in Key Regions: Utilize Avaza’s support for Direct Debits from customer bank accounts in Europe (SEPA), the USA (ACH), the United Kingdom (Bacs), Australia & New Zealand (BECS), and Canada (PADs) for streamlined transactions.
– Communicate Payment Options to Customers: Actively inform your customers about the available online payment options, ensuring they are aware of the convenient ways to settle their invoices.
Timely Issuance
– Send invoices promptly after service delivery or according to the agreed-upon schedule, which helps in faster payment.
Adding Uninvoiced Items to the Invoice
– Include All Billable Items: Ensure that every invoice you send out includes all unbilled amounts such as billable timesheets, expenses, and any fixed amounts associated with a project. This practice ensures that all chargeable work is accurately billed to the client.
– Link Invoice Items to Projects for Revenue Tracking: For effective project revenue reporting, link each invoice line item to its corresponding project. This helps in accurately tracking project revenue and analyzing the financial health of each project.
– Group Timesheets and Expenses Separately: On each invoice, group timesheets and expenses separately for clarity. This makes the invoice easier to understand for the client, reducing queries and speeding up payment processes.
–Utilize Avaza’s Reporting Features: Make use of the uninvoiced Items Dashboard widget and report to identify any items available for invoicing.
Digital Attachments
– Attach relevant documents, such as contracts, work orders, or detailed reports, directly to the invoice.
Records and Auditing
– Keep comprehensive records of all invoices and payments for financial tracking and auditing purposes.
Use Recurring Invoices to automate the billing process
– Leverage Automation for Consistent Revenue: Utilize Avaza’s recurring invoice feature to automate the billing process. This ensures timely and consistent invoicing, aiding in steady revenue collection.
– Set Optimal Invoice Schedules: Establish a preferred schedule for your recurring invoices. Decide on a frequency (monthly, quarterly, etc.) that aligns with your business model and client agreements to ensure regular and predictable billing.
– Utilize Dynamic Fields for Customization: Incorporate dynamic fields in your invoices for the subject line, item descriptions, and notes. For example, automatically include the current month or specific project details in each invoice to minimize manual entry and reduce errors.
– Incorporate Unbilled Time and Expenses: Configure your recurring invoices to automatically include any unbilled time and expenses. This ensures that all billable work is captured and charged, enhancing revenue and reducing the likelihood of overlooked charges.
– Review and Update Recurring Invoices Regularly: Periodically check your recurring invoice setups to make sure they remain accurate and reflect any changes in service offerings, pricing, or client agreements.
– Communicate Clearly with Clients: Ensure that clients are informed about the recurring billing system. Transparency about billing cycles and invoice contents fosters trust and reduces confusion or disputes.
– Monitor Receivables from Recurring Invoices: Regularly track payments from recurring invoices to manage cash flow effectively. Promptly follow up on any overdue payments to maintain financial health.
– Customize Invoices for Client Needs: Tailor each recurring invoice to meet the specific needs and agreements with each client. Personalization can include specific billing details, discounts, or special terms agreed upon.
Automated Reminders
– Set up automated reminders for upcoming and past-due invoices to reduce the need for manual follow-up.
Client Portal Utilization
– Use the client portal where clients can view, download, and pay invoices directly, which can streamline the payment process.
Resource Scheduling Conventions
Resource scheduling is a critical component for the successful delivery of projects within a company. Effective utilization of a tool like Avaza for resource scheduling requires establishing best practices that align with your organization’s goals and project needs. Below is a list of best practice conventions that can be adopted for the Resource Scheduling module in Avaza:
Understand User Roles
– Assign Roles Thoughtfully: Differentiate between Schedule Users, Managers, and Viewers based on team members’ responsibilities.
– Empower Schedule Managers: Assign team leaders or project managers as Schedule Managers to oversee and adjust team schedules.
Skill Matching
– Maintain an up-to-date centralized database of all resources including their skills, experience levels, and availability.
– Team Schedule for Overview: Use the Team Schedule view for a comprehensive understanding of project allocations and team availability.
– Personal Schedules for Accountability: Encourage individuals to regularly check their ‘My Schedule’ page for personal task tracking and time management.
Optimize Schedule Management Settings
– Set Default Working Hours: Establish standard working hours to serve as a baseline for scheduling.
– Customize for Team Members: Adjust individual working hours and days to reflect each team member’s actual availability.
Leverage Resource Allocation Features
– Efficiently Schedule Tasks and Leaves: Use the scheduling feature to assign tasks and book leaves, ensuring a realistic workload distribution.
– Sort by Availability for Resource Allocation: Utilize the sorting feature by availability in the Resource Scheduling module to quickly identify over and under-allocated resources. This aids in efficiently balancing workloads and preventing burnout or underutilization of team members.
– Use Advanced Filtering for Skill-Based Allocation: Leverage the filtering capability to view all users with specific skills, or those working on a particular project category. This targeted approach enhances the assignment of tasks based on skill sets and project needs, ensuring optimal resource utilization and project alignment.
– Keep Schedules Updated: Regularly update schedules to reflect changes in project timelines or team member availability.
– Ensure Accuracy in Timesheets: Verify that timesheets accurately represent work done, adjusting entries as necessary.
Maximize Use of Project Categories:
– Categorize Projects: Use color codes and categories for easy identification and organization of projects.
– Regularly Review Project Categories: Ensure that categories remain relevant and update them as your business evolves.
Conduct Regular Reviews:
– Schedule Regular Audits: Regularly review the resource allocation and schedules to ensure they are aligned with current project priorities and team capacities.
– Gather Feedback: Regularly ask your team for feedback on the tool and its implementation.
– Adapt and Improve: Use feedback to refine how you use Avaza, ensuring it continuously aligns with your business needs.
Reporting Conventions
Adhering to these best practice conventions, your team can leverage the full potential of Avaza’s Reporting module to maintain robust oversight and strategic alignment across all projects and business activities.
Access Control for Data Security
Implement stringent access control measures within the reporting module to maintain data security and integrity. Configure user roles diligently to guarantee that team members only access reports and data pertinent to their responsibilities. This practice not only safeguards sensitive information but also ensures that resources are not overwhelmed with irrelevant data, allowing for a focused and effective use of the reporting tools at hand.
Regular Report Generation
Establish a routine for generating reports to maintain consistent oversight of your projects, finances, and resource allocation. Weekly, monthly, and quarterly reports can reveal trends and provide actionable insights.
Dynamic Report Customization
Take advantage of Avaza’s real-time reporting feature. Implement powerful filters to segment your data as needed. Once tailored, save these report configurations for quick access and share them with relevant team members. Ensure exportability by using available formats such as Excel and PDF.
Scheduled Report Deliveries
Automate your reporting process by scheduling regular report deliveries. By receiving these reports directly in your inbox, you ensure consistent oversight and save time in the process.
Project Portfolio Management
Regularly monitor your project’s health using tools like the Project Dashboard report. Identify projects that may be over budget, need invoicing, or are potentially at risk to ensure profitability.
Staff Utilization Optimization
Maximize team efficiency by regularly analyzing the Staff Utilization report. By comparing billable vs. non-billable hours and scheduled hours, you can make informed decisions about resource allocation.
Task Monitoring
Prioritize team productivity by consistently reviewing key performance indicators. Track metrics such as near-due or overdue tasks, time estimates, task completion percentage, and remaining effort to ensure timely delivery.
Business Performance Overview
Regularly utilize the suite of ready-made financial reports available in Avaza. These reports provide insights into cash flow management and overall business profitability, helping to demystify your business’s financial standing.
Financial Operations Analysis
Frequently review financial data to pinpoint unbilled time, expenses, and fixed amounts. Ensure you have real-time visibility into all outstanding invoices to streamline billing processes.