Overview
Avaza API supports the common OAuth2 Authentication standard for authenticating your service/app/site to access our apis.
At first OAuth2 might seem a little tricky, but it’s a good formalization of a bunch of best practices, and the flexibility and security it brings is worth it.
OAuth2 includes several different ‘flows’ to support different types of services.
The most common are Authorization Code flow for server-to-server integrations, and the Implicit flow, for connecting to browser/single-page/mobile apps.
Avaza supports both of these.
We support and encourage use of the PKCE extension on the OAuth2 code flow for Mobile & SPA apps.
Avaza’s ‘Swagger’ API documentation can be found at https://api.avaza.com/
The swagger documentation iteself uses the OAuth2 Implicit Flow to allow you to test api calls within the browser.
Avaza also supports Personal Access Token method for your developers to conveniently authenticate one-off apps and scripts. You can learn more about this method by following this link.
Creating an App
Before you can begin the OAuth process, you must first register a new app with the service. You can register a new OAuth app by navigating to Settings > Manage Developer Apps and then click “Add OAuth App” button. You must have Admin right to access this feature.

Enter the App Name, Description, App Authentication Client Type, Redirect URL and the Scopes the app would need access to.

Click Save to create the app. The App Client ID and App Secret will be displayed on screen. Please note that the App Secret will not be displayed again so you must copy and paste it safely. The Secret is used for the Authorization Code flow, and adds an extra layer of security for server-to-server implementations.

You can view all the OAuth 2 Apps on the Developer Apps page. If you wish to update the App Name, Description, Redirect URL or Access Scopes then simply click the record to open the edit popup. To delete an existing app simply click on the cross icon to the right of the app record. System will request you to confirm if you really want to delete the app. Once confirmed the app will deleted.
Server-to-Server apps (OAuth2 Authorization Code flow)
Server-to-server apps are the most common type of app integration. These use the OAuth2 Authorization Code flow.
The general idea is a user is redirected to Avaza where they can login and verify your app should be given permissions to their account. Then they are redirected back to your app. A temporary, short lived Authorization Code is issued after the redirect, which your app then uses to directly request a longer-lived Access Token & Refresh Token. If the Access Token expires, you can use the Refresh Token to get a fresh Access Token & Refresh token.
Authorization Codes last for 5 minutes, Access Tokens for 24 hours and Refresh Tokens for 180 days.
Step 1 – /oauth/authorize
DESCRIPTION
- Step 1 of authentication. Create a “Connect Avaza” link, which directs the authenticating user to
/oauth2/authorize. This isn’t an API call per se, but rather a web endpoint that lets the user sign in to Avaza and choose whether to grant the application the ability to make api requests on their behalf.
If the user is not currently logged into their Avaza account, they will be first redirected to Authenticate using Avaza’s standard login screen.
Without the user’s authorization in this step, it isn’t possible for your application in step 2 to obtain an access token from/oauth2/access_token.
- URL STRUCTURE
-
https://any.avaza.com/oauth2/authorize?response_type=code&client_id=CLIENT_ID&redirect_uri=REDIRECT_URI&scope=SCOPE
- METHOD
- GET
- PARAMETERS (QueryString)
-
- response_type: required. must be ‘code’ for the server-to-server Authorization Code flow.
- client_id: required. The unique Client ID integer value provided by Avaza for your App.
- redirect_uri: required. The url on your server where the user should be redirected to with the response to the authorization code request. If you provided us with a redirect url when registering your app, then these must match.
- scope: required. the URL encoded set of scopes (i.e. permissions) required by your app. Multiple scopes should be requested by comma separating them. Avaza supports a few different scopes that grant access to particular endpoints. To allow multiple scopes, you would use use read_account, read_contacts. URL encoded, that becomes read_account%2Cread_contacts.
- state: optional. Up to 500 bytes of arbitrary data that will be passed back to your redirect URI. This parameter should be used to protect against cross-site request forgery (CSRF). See Sections 4.4.1.8 and 4.4.2.5 of the OAuth 2.0 threat model spec.
USER SEES
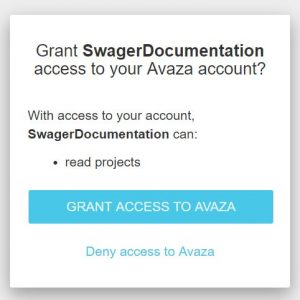
- RETURNS
- After the user authorizes the application, they are redirected to your Return URI.
- If the user granted access, these parameters are passed in the query string (after the ? in the URL):
- code The authorization code, which can be used to attain a bearer token by calling
/oauth2/token. - state The state content, if any, originally passed to
/oauth2/authorize.
- code The authorization code, which can be used to attain a bearer token by calling

Sample Success response:
[REDIRECT_URI]?code=ABCDEFG&state=[STATE]
ERRORS
In either flow, if an error occurs, including if the user has chosen not to authorize the app, the following parameters will be included in the redirect URI:
- error An error code per Section 4.1.2.1 of the OAuth 2.0 spec.
- error_description A user-friendly description of the error that occurred.
- state The state content, if any, originally passed to
/oauth2/authorize.
Sample Error response:
[REDIRECT_URI]?error=access_denied&error_description=[plain text error message]
Step 2 – /oauth2/token
- DESCRIPTION
- An app calls this endpoint to acquire a bearer token once the user has authorized the app.
Calls to
/oauth2/tokenneed to be authenticated using the apps’s key and secret. These can be passed as POST parameters (see parameters below).
- URL STRUCTURE
-
https://any.avaza.com/oauth2/token
- METHOD
- POST
- PARAMETERS
-
- code required. The code acquired in step 1 by directing users to
/oauth2/authorize?response_type=code. OR a valid refresh_token obtained from a previous request. - grant_type required. The grant type, which must be
authorization_code or refresh_token. - client_id required. Provided by Avaza when registering your app.
- client_secret required. Provided by Avaza when registering your app.
- redirect_uri Only used to validate that it matches the original
/oauth2/authorize, not used to redirect again.
- code required. The code acquired in step 1 by directing users to
- RETURNS
- A JSON dictionary including: an access token (
access_token), integer time till access token expiration in seconds (expires_in), token type (token_type), refresh token (refresh_token)/.
The token type will always be “bearer”.HTTP Response 200 OK code.Sample success response{"access_token": "ABCDEFG", "expires_in":"86400", "token_type": "bearer", "refresh_token": "12345"}
ERRORS
Return an HTTP response header code. e.g. 401 Unauthorized, as well as JSON dictionary response containing error and error_description properties.
Sample error response:
{"error": "invalid_request", "error_description": "You must provide a value for code"}
Step 3 – Making API Calls
In Step 2, you obtained an access_token & refresh_token.
The access token is the key to making successful requests to the Avaza API. You’ll should store it someplace secure, along with the refresh token. You will use the access token each time your app needs data from Avaza for that account. If you get an unauthorized (401) response from an API call, your access_token has probably expired, and you can use the refresh_token to retrieve a fresh pair of tokens (by calling /oauth2/token with grant type of refresh_token).
Now your app is authorized to use the Avaza API on behalf of your user. When you’d like to make API calls to Avaza, simply include the authorization header, "Authorization: Bearer <YOUR_ACCESS_TOKEN_HERE>", with each request.
The full set of Avaza APIs are documented here: https://api.avaza.com/
Single Page Web Application/Javascript/Mobile Apps (OAuth2 Implicit flow)
Please note that implicit flow for Single Page Applications is no longer security best practice, and it’s better to implement the Oauth2 Code flow + PCKE. When setting up OAuth2 apps, you can identify whether you are using a Sever-To-Server or Mobile/SPA client. For Mobile/SPA the client_secret is not used and not validated. Instead we encourage PKCE.
These use the OAuth2 Implcit flow.
This is a simplified flow that provides an access_token in a single step, and does not require the client secret (as you wouldn’t have a safe place to store it).
The general idea is a user is redirected to Avaza where they can login and verify your app should be given permissions to their account. Then they are redirected back to your app. The server redirects back to your Redirect URI, and provides an Access Token in the querystring. There are no Authorization Code or Refresh Tokens.
The Access Tokens is valid for 24 hours.
Step 1 – /oauth/authorize
DESCRIPTION
- Step 1 of authentication. Create a “Connect Avaza” link, which directs the authenticating user to
/oauth2/authorize. This lets the user sign in to Avaza and choose whether to grant the application the ability to make api requests on their behalf.
If the user is not currently logged into their Avaza account, they will be first redirected to Authenticate using Avaza’s standard login screen.
- URL STRUCTURE
-
https://any.avaza.com/oauth2/authorize?response_type=token&client_id=CLIENT_ID&redirect_uri=REDIRECT_URI&scope=SCOPE
- METHOD
- GET
- PARAMETERS (QueryString)
-
- response_type: required. must be ‘token’ for the Implicit flow.
- client_id: required. The unique Client ID integer value provided by Avaza for your App.
- redirect_uri: required. The url on your server where the user should be redirected to with the response to the token request. If you provided us with a redirect url when registering your app, then these must match.
- scope: required. the URL encoded set of scopes (i.e. permissions) required by your app. Multiple scopes should be requested by comma separating them. Avaza currently supports read and write scopes. To allow both , you would use read,write. URL encoded, that becomes read%2Cwrite.
- state: optional. Up to 500 bytes of arbitrary data that will be passed back to your redirect URI. This parameter should be used to protect against cross-site request forgery (CSRF). See Sections 4.4.1.8 and 4.4.2.5 of the OAuth 2.0 threat model spec.
USER SEES
-
- RETURNS
- After the user authorizes the application, they are redirected to your Return URI.
- If the user granted access, these parameters are passed in the URL fragment (after the # in the URL)
- access_token The access token which can be used to authenticate subsequent api calls.
- token_type currently always “bearer”
- expires_in the number of seconds till the access token will expire
- state The state content, if any, originally passed to
/oauth2/authorize.
Sample Success response:
[REDIRECT_URI]#access_token=ABCDEFG&token_type=bearer&expires_in=86400&state=[STATE]
ERRORS
In either flow, if an error occurs, including if the user has chosen not to authorize the app, the following parameters will be included in the redirect URI in the querystring (after the ?):
- error An error code per Section 4.1.2.1 of the OAuth 2.0 spec.
- error_description A user-friendly description of the error that occurred.
- state The state content, if any, originally passed to
/oauth2/authorize.
Sample Error response:
[REDIRECT_URI]?error=access_denied&error_description=[plain text error message]
Step 2 – Making API Calls
In Step 1, you obtained an access_token.
The access token is the key to making successful requests to the Avaza API. You’ll should store it someplace secure, generally along with the user’s session information. You will use the access token each time your app needs data from Avaza for that account. If you get an unauthorized (401) response from an API call, your access_token has probably expired, and you will need to redirect the user to get a fresh one.
Now your app is authorized to use the Avaza API on behalf of your user. When you’d like to make API calls to Avaza, simply include the authorization header, "Authorization: Bearer <YOUR_ACCESS_TOKEN_HERE>", with each request.
The full set of Avaza APIs are documented here: https://api.avaza.com/
2 Comments
Hi guys,
Please offer some more functionality in the API. Including:
– Task Update: should be able to change TaskStatusCode and SectionIDFK
– Timesheets: should be able to obtain the name of the timesheet approver
Kind regards
Koen
Hi Koen,
I noticed you also had a chat with our support team about this. 🙂 I’ve gone ahead and asked them to record the requests you did not leave with them yet.