Since this article was published, we have updated our Recurring Invoices feature. You can get updated information here.
Do you have any subscription based invoicing that needs to be done on a regular basis? Starting now, you can automate this process by using our brand new module for recurring invoicing! The Avaza team has worked hard to develop a powerful and flexible solution for managing any invoicing you need to perform on a regular basis.
As Avaza’s invoicing can be linked to your overall consulting/project management ecosystem, you have a totally streamlined way of including any uninvoiced timesheets and expenses as well.
But first things first:
How do I create a recurring invoice?
Let’s walk through this process with a potential use case:
Customer Use Case
Imagine you have just secured a tenant for one of your commercial properties, and signed a 12 month contract with them. As part of the contract, the rent must be paid monthly in advance and if there are any cost in terms of repairs or labour charges they must be paid by the tenant.
This is an ideal scenario for setting up a recurring invoice that charges the agreed rental amount and any other time & material services that are incurred during the month.
So here is how we will set-up our first recurring invoice:
- Login and navigate to Invoicing > Recurring Invoices. From this page you can create a new recurring profile and view existing profiles.
- Click Create button to start creating your first recurring invoice. Select an existing customer or add a new one and then click create. This will land you on Create Recurring Invoice page.
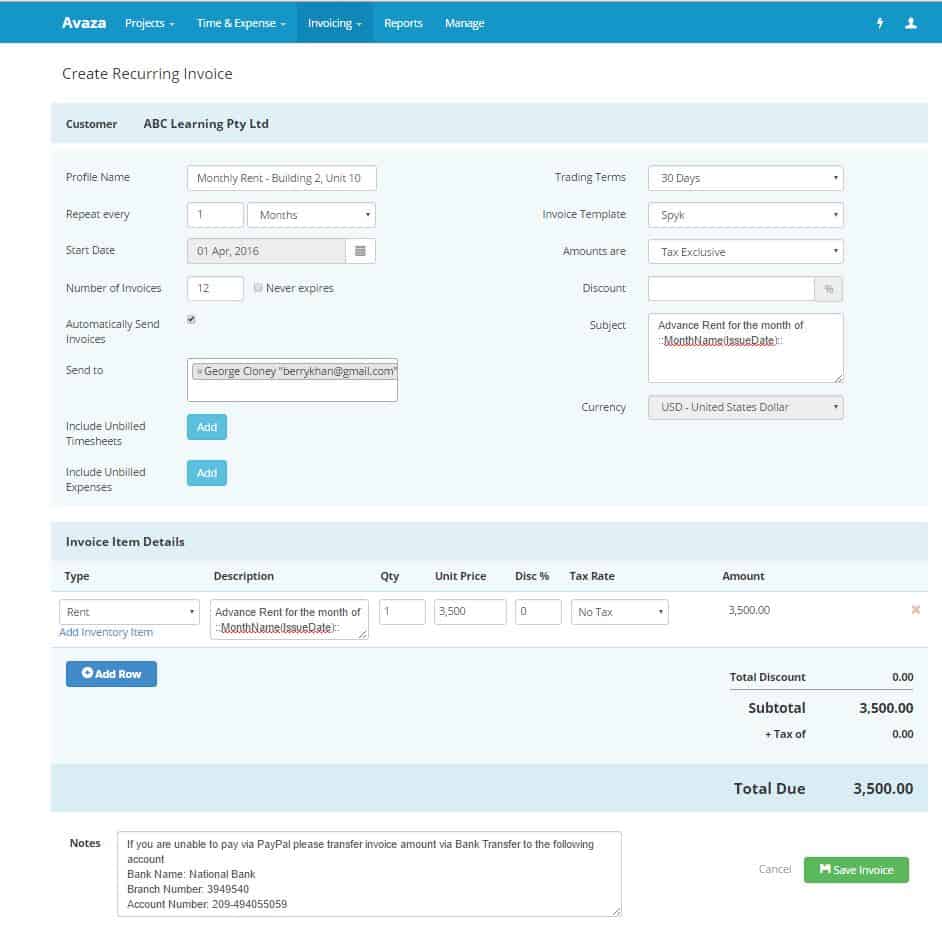
Recurring Invoice – Create Page - Let’s walk through some of the fields that are specific to recurring invoices.
- Profile Name – Simply enter a name that will help you identify a particular profile
- Repeat Every – Here you select at what frequency the invoice should be generated. In our example we want the invoice to be generated once every month. So we have selected 1 and Months from the drop down. If you wish to send an invoice every three month then simply enter 3 and Months from the drop down. You can also choose Days from the drop down for intervals that need to be defined in terms of days. For example every 7 days if you want to send an invoice weekly or every 14 days if you wish to send an invoice every 2 weeks.
- Start Date – Select the date when the first invoice will be generated. This date must be today or in the future. In our example the contract start date is 01 April 2016.
- Number of Invoices – Enter the number of invoices that you want sent out in total by this profile. In this case we have a 12 month contract hence I have entered 12. If the contract has no fixed term then you can select the Never expires checkbox.
- Automatically Send Invoices – If you prefer sending your invoices to the customer contact immediately then select this checkbox and select the relevant customer contact. If you prefer creating a draft invoice instead that you can review and send later then leave the checkbox unticked.
- Include Unbilled Timesheets – Click this button if you wish to add unbilled time for all your projects, or a specific one, when generating an invoice. In our example you have an agreed hourly rate if one of your contractors is engaged for maintenance work. The contractor simply performs the work and enters their timesheet. This timesheet is automatically picked up and added to the invoice. No need to remember sending those charges separately. Awesome! You can opt to group timesheet entries by project or category (refer to the screenshot) and also decide what fields are added to the invoice item description if you select the No Grouping option.
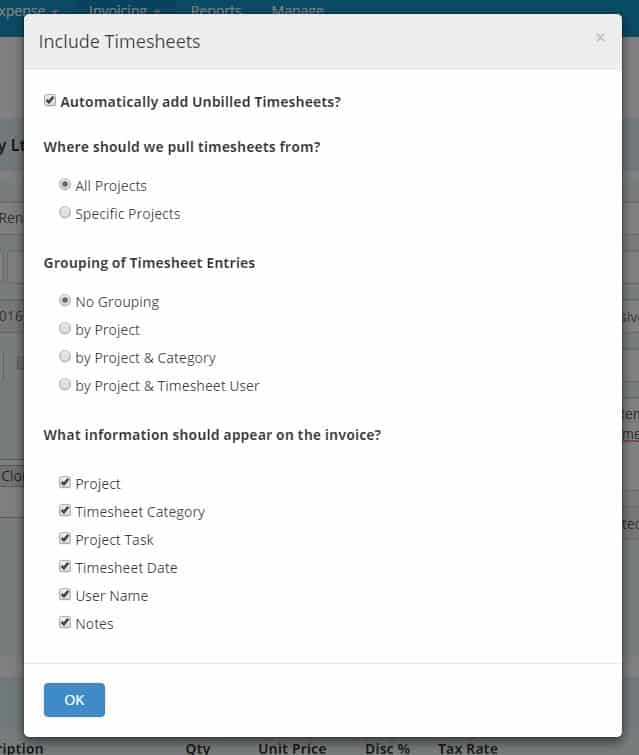
Recurring Invoicing – Include Time - Include Unbilled Expenses – Same goes for expenses. If you have any hard costs like materials that need to be passed on to the customer then you can configure this option in flexible ways. For instance filter for uninvoiced expenses entered against a particular project or all projects. You can also decide what fields from the expense entry should be added to the invoice description field.
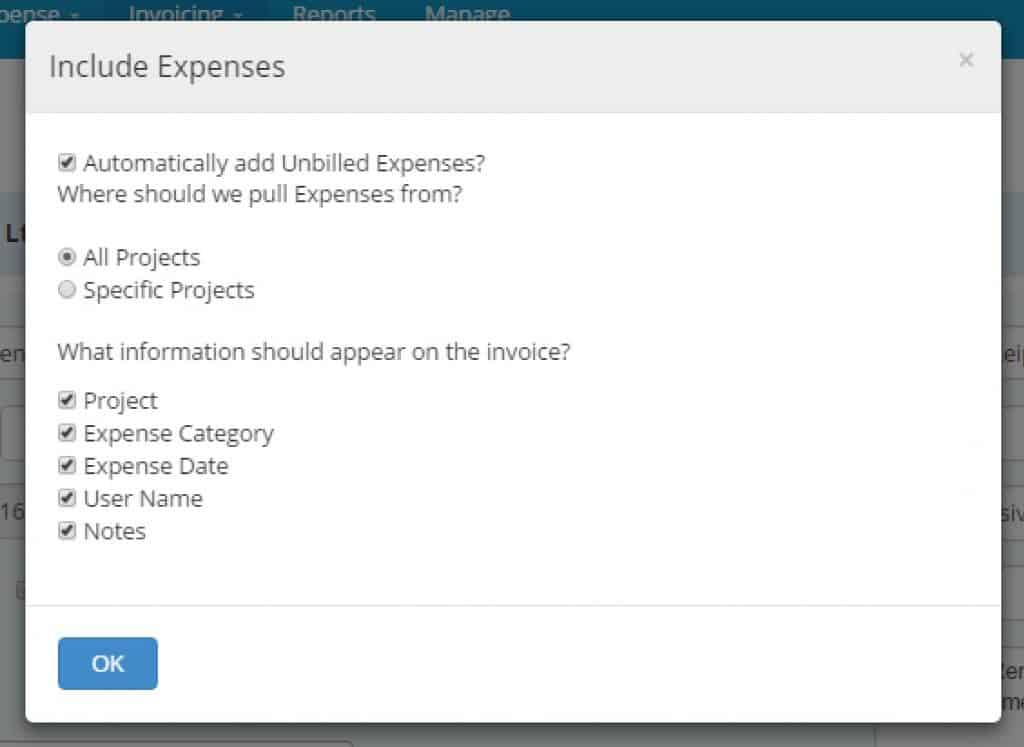
Recurring Invoicing – Include Expenses - Other fields like Trading Terms, Invoice Template, Amounts Are, Discount, Subject and Currency are standard ones that are also present when manually creating an invoice.
- Enter the details for the line items you want to invoice your customer on a regular basis. In our case we want to invoice them for a monthly rent of $3,500 USD.
- Enter any notes you wish and click Save. Voila! We have our first recurring profile.


Another special feature is the use of dynamic variables in Subject, Line Item Description & Notes field. These variables are replaced with real values when an invoice is generated. In our example we are using ::MonthName(IssueDate):: variable which will be replaced with the month name of the invoice issue date. So if the Invoice is issued on 01 April 2016 then this variable will be replaced with April. These variables give context to each invoice and makes it much easier for your customer to identify what the invoice is actually for. For complete list of dynamic variables and some examples of how they can be used please refer to the detail blog post.

The recurring invoice detail page displays all the important information. If you have configured to automatically add time & expenses, then you will see the + New Timesheets & + New Expenses labels under the Total Amount, indicating that uninvoiced time & expenses will be added on top of the recurring invoice line items.
You can click the Associated Invoices box to view all the related invoices that are generated by a particular recurring invoice. This is particularly handy if you quickly want to get to a specific invoice generated by a profile.

The recurring invoice detail page also allows you to make changes or even delete the profile. Depending on the status of the profile it can be stopped or resumed as well.
A profile can exist in one of the following statuses, and you can filter the recurring invoice list accordingly:
- Active – The profile is scheduled to generate at least one or more invoices.
- Stopped – The profile has been stopped. It will not generate any further invoices.
- Expired – The profile has zero remaining invoices. No further invoices will be generated.
What time is your invoice sent?
You can decide the time the invoices are generated by navigating to Settings Cog [icon color=”Extra-Color-3″ animation_speed=”Slow” size=”tiny” icon_size=”” animation_delay=”” image=”fa-cog”] > Invoice Settings and updating the Recurring Invoice Send Time field. By default this value is set to 10:00 am local time of your account’s time zone.

We hope this recurring invoice module saves you a whole lot of trouble and time. Feel free to share your feedback with us by following this link or on our Twitter, Facebook or LinkedIn profile!
Cheers!